“Vibe coding” is a term that recently exploded in popularity (coined by AI pioneer Andrej Karpathy) to describe a completely new way of building software. Instead of obsessing over syntax, debugging line-by-line, or memorizing documentation, you focus entirely on the high-level logic, the flow, and the « vibe » of the app.
You describe what you want to the AI, accept its code, run it, and if it breaks, you just copy-paste the error back into the AI.
Replit is arguably the ultimate platform for vibe coding. Because it’s cloud-based, has zero local setup, and features the Replit Agent, it removes all the friction that usually kills a good coding flow.
Here is your ultimate guide to mastering the « Vibe Coding » workflow on Replit.
🌊 The Replit Vibe Coding Workflow
1. Set the Scene (The Initial Prompt)
Don’t start by thinking about database schemas or CSS classes. Start with the vision. Open a new Repl, summon the Replit Agent, and give it a high-level prompt.
- Bad Vibe: « Create a React app with a Node backend and a PostgreSQL database with these specific tables… »
- Good Vibe: « Build a sleek, dark-mode habit tracker. I want to be able to add daily habits, check them off, and see a streak counter. Make the UI feel modern, using neon green accents for completed tasks. »
2. Let the Agent Cook (Hands Off)
Once you hit enter, the Replit Agent will scaffold the project, install dependencies, write the frontend and backend, and set up the database.
- The Vibe Rule: Do not touch the keyboard. Watch the terminal, watch the files populate, and let the AI do the heavy lifting.
3. The « Vibe Check » (Visual Review)
Once the Agent finishes, open the Webview on the right side of your screen. Click around.
- Does it look right?
- Does it feel fast?
- Is the UX intuitive?
- Remember: You are the Product Manager and the Art Director now. You are not the typist.
4. Iterate via « Vibe Corrections »
When you find something you don’t like, or if the app crashes, do not open the code files to fix it.
- If the UI is off: Tell the Agent, « The buttons are too small and the neon green is too harsh. Make the buttons larger and use a softer mint green. »
- If it crashes: Open the browser console or the Replit shell, copy the red error text, and paste it to the Agent: « I’m getting this error when I click ‘Add Habit’. Fix it. »
🧠 Pro-Tips for Maintaining the Vibe
- Commit Often: The Replit Agent is smart, but it can sometimes get confused and overwrite good code with bad code. Use Replit’s built-in Version Control (Git) to commit your work every time the app reaches a good state. If the AI ruins the vibe, you can just roll back.
- Keep Prompts Bite-Sized: Don’t ask the Agent to build a massive feature all at once. Ask it to build the login screen. Once that works, ask it to build the dashboard. Once that works, ask it to connect them.
- Use the
replit.confand Secrets: If your app needs API keys (like OpenAI or Stripe), put them in Replit’s Secrets tab. Tell the Agent, « Use the environment variableOPENAI_KEYto authenticate, » rather than hardcoding things. - Deploy Early: Replit allows you to deploy your app to a live URL with one click. Send the link to your friends. Getting real user feedback while the app is live keeps the momentum (and the vibe) going.
⚠️ The Danger of the Vibe
Vibe coding is incredible for:
- Building MVPs (Minimum Viable Products) in hours instead of weeks.
- Prototyping ideas to see if they are worth pursuing.
- Creating personal tools, dashboards, and internal apps.
- Learning new frameworks by seeing how the AI structures them.
However, it is dangerous for:
- Mission-critical enterprise software.
- Apps handling sensitive financial or health data (unless you heavily audit the AI’s security practices).
- Massive, long-term codebases.
Because you aren’t reading the code, « vibe coding » can quickly result in spaghetti code. The AI might take a shortcut that works today but makes the app impossible to scale next month. If your vibe project turns into a serious business, you will eventually need to bring in a traditional developer to « clean up the vibe. »
Use other LLMs to help you write the perfect initial prompt for the Replit Agent!
See also
Here is a compact, structured summary of the « Vibe Coding 101 with Replit » transcript, stripping out the filler and focusing purely on the actionable strategies and concepts.
🚀 Vibe Coding 101 with Replit: The Compact Guide
Vibe Coding is the practice of relying on AI agents to write the actual code, allowing you to focus on high-level logic, product vision, and rapid iteration. Replit is the ideal environment for this because it is 100% browser-based (zero local setup) and includes built-in full-stack infrastructure (databases, auth, storage, 1-click deploy).
🛠️ The Replit AI Toolkit
- Replit Agent: The heavy lifter. Use it to scaffold projects from scratch, generate build plans, and execute complex, multi-step code changes.
- Replit Assistant: The lightweight helper. Use it for quick chat, one-off code edits, and asking questions about your project.
- The Pattern: Use the Agent to build the MVP and get things working. Switch to the Assistant to dial in specific features and refine functionality.
📋 Golden Rules for the Vibe Coder
- Be Precise & Bite-Sized: Give the AI one task at a time. Break complex features into smaller, logical steps.
- Start Fresh: Start a new chat session for each new feature to keep the AI’s focus sharp.
- Review & Learn: Don’t blindly accept code. Read the Agent’s explanations to understand how it solved the problem. Question illogical choices, but trust its ability to surprise you with elegant solutions.
- Be Patient with Debugging: AI isn’t perfect. Debugging is a normal part of the process; give the AI time and clear information to fix errors.
🧠 The 5 Pillars of Vibe Coding
1. Thinking (Computational & Procedural)
Move beyond basic logic. Think about the patterns of your app (computational) and the edge cases/boundaries required to make it excel (procedural). Translate these thoughts into clear natural language for the AI.
2. Frameworks (Leveraging Existing Solutions)
You don’t need to memorize every library. If you don’t know how to build something (e.g., a drag-and-drop UI), ask the AI: « What are the best React frameworks for implementing drag-and-drop? » Use the AI to navigate the problem space and learn the tools it is using.
3. Checkpoints (Version Control)
Things will break. Replit has built-in version control. Work in short sprints, test thoroughly after every addition, and commit to a checkpoint. If a new prompt ruins your app, simply roll back to the last working state. Never pile up unstable code.
4. Debugging (First Principles)
Treat debugging like checking if a lamp is plugged in before replacing the bulb.
- Understand how the app is supposed to work.
- Isolate where the error is happening.
- Find the root cause.
- Feed that specific root cause back to the AI to fix it.
5. Context (Managing the Context Window)
The « context window » is the AI’s short-term memory. If you overload it, it forgets things.
- Keep it relevant: Only give the AI the information, documentation, and error logs strictly related to the current feature you are building.
- Provide updates: If using a brand-new library the AI might not know, paste the official documentation into the chat to give it the right context.
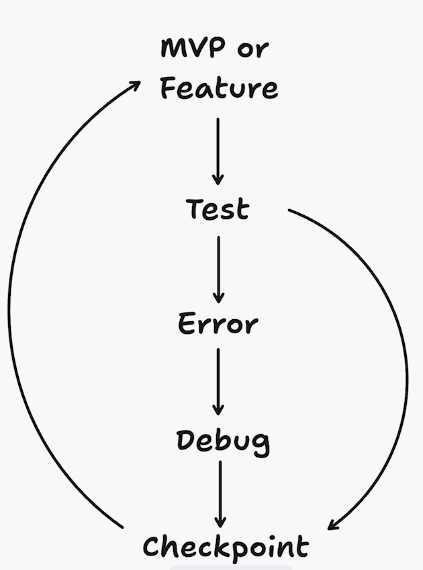
🔄 The Ultimate MVP Development Loop
To build successfully, follow this continuous cycle:
- Prompt: Ask the Agent to build a specific, bite-sized feature.
- Test: Try to use the app and intentionally try to break it.
- Debug: If it breaks, isolate the error and feed the context back to the AI to fix it.
- Checkpoint: Once it works perfectly, save your progress (commit).
- Repeat: Start a fresh session and prompt the next feature.
🛠️ Building an SEO Analyzer with Replit Agent: The Compact Guide
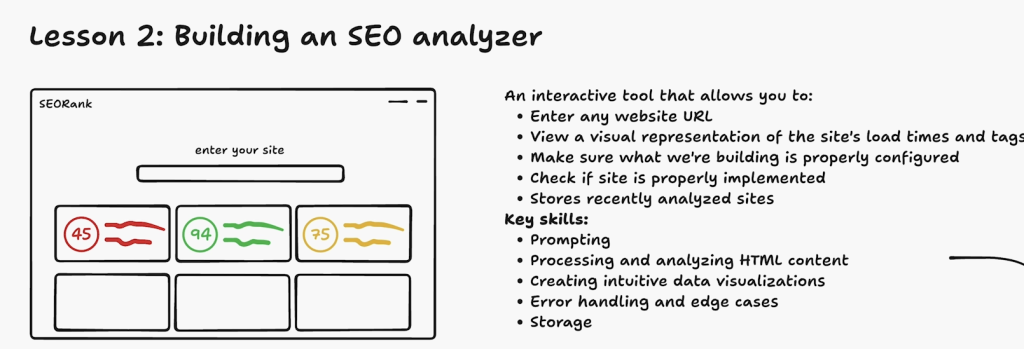
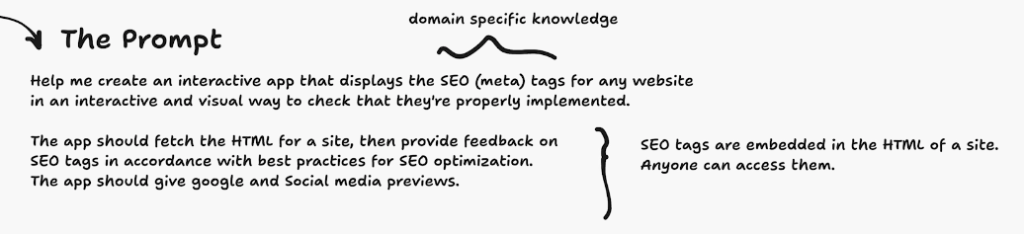
This lesson walks through building a functional SEO analyzer from scratch. The core takeaway is that Vibe Coding isn’t just about typing prompts; it’s about planning, understanding your domain, and iterating with precision.
📝 Phase 1: Plan Before You Prompt
Don’t jump straight into the AI. Take 5 minutes to conceptualize.
- Wireframe & PRD: Sketch the user flow. (e.g., User enters URL -> App fetches HTML -> App displays SEO score and social media previews).
- Learn the Domain: You don’t need to be a coder, but you need to know the terminology. If you want the app to check SEO, learn what « meta tags, » « title tags, » and « descriptions » are.
- Use Domain Jargon: Use the terms you learned in your prompt. Instead of saying « check the website text, » say « fetch the HTML and analyze the SEO meta tags. » The AI understands specific frameworks and terminology.
🤖 Phase 2: The Agent Workflow
When you submit your prompt, Replit Agent doesn’t just start coding blindly.
- Review the Plan: Agent will output a step-by-step plan. Read it to ensure it’s using the right approach and integrations, then approve it.
- Scaffolding the MVP: Agent will build a full-stack app (frontend client + backend server) in 5–10 minutes.
- Live WebView: The preview window isn’t just
localhost. It generates a live, temporary public URL that you can open on your phone or send to a friend while you build.
🔍 Phase 3: Test and Iterate (The « Vibe Check »)
Once the MVP is built, put on your « Product Manager » hat. Test it with real URLs and look for flaws.
- Check the Data: Does it actually extract the right tags? Are the social media previews rendering correctly?
- Check the UI (Attention to Detail): Look closely at spacing, padding, and alignment. Is the text overlapping?
- Write Precise Iteration Prompts: When asking for fixes, use web development terminology and be hyper-specific.
- Good Prompt: « Make the app fully responsive and mobile-friendly. Fix the alignment and padding issues. Specifically, center the overall SEO score and remove the ‘/100’ text. »
🧠 Pro-Tips for Replit Mastery
- Manage the Context Window: As your chat history with the Agent gets longer, the AI’s « memory » gets bloated, and it may slow down or make mistakes. Start a new chat session when you are ready to build a completely new feature to give the AI a fresh context window.
- Reverse-Engineer to Learn: You don’t have to look at the code Replit writes. However, opening the file tree and seeing how the Agent organizes folders (e.g., separating
clientfrontend files fromserverbackend files, or grouping UI elements in acomponentsfolder) is a massive cheat code for learning how real software is structured. - Embrace the Bug-Fix Loop: Vibe coding is an iterative loop. If you test the app and realize it crashes unless you type « https:// » in the URL, don’t get frustrated. Just tell the Agent: « Make it so I don’t have to type https every time. » Fix one thing, test again, and move on.
Here is a compact, actionable summary of the lesson on enhancing and deploying the SEO Analyzer.
🚀 Enhancing & Deploying the SEO Analyzer: The Compact Guide
This lesson focuses on polishing the MVP, switching between AI tools for different tasks, and deploying your app to the live web.
🔄 Agent vs. Assistant: Know the Difference
Use the right tool for the job to maximize efficiency.
| Feature | Replit Agent | Replit Assistant |
|---|---|---|
| Best For | Building core features, scaffolding, complex multi-step changes. | Quick edits, UI tweaks, bug fixes, simple customizations. |
| Speed | Slower (5-10 mins). Thorough. | Fast (seconds/minutes). Lightweight. |
| Context | Creates a full project plan. | Reads relevant files and edits directly. |
Pro Tip: When starting a major new feature or iteration phase, create a new chat with the Agent. This clears the « context window » (memory), preventing the AI from getting confused or slowed down by previous instructions.
🎨 Phase 1: Polishing with Agent (Visual Overhaul)
To make the app more useful, we asked Agent to improve the data visualization.
- The Goal: Move beyond a single score. Create visual summaries for categories of meta tags (SEO, Social Media, Technical).
- The Prompt Strategy: Be explicit about retaining functionality.
- Prompt: « Make the app more visual and user-friendly for SEO beginners. Create visual summaries for each category of meta tag. Do not remove any existing functionality; just add high-level summaries and allow users to drill down into details. »
- The Result: A dashboard showing « Key Findings, » « Priority Recommendations, » and category breakdowns (Robots.txt, Open Graph, Twitter Cards) alongside the raw data.
🛠️ Phase 2: Quick Fixes with Assistant
Switch to Assistant for rapid, granular tweaks that don’t require a full rebuild.
1. Automating URL Entry
- Task: Stop users from typing « https:// » manually.
- Prompt: « Make the website entry form automatically populate ‘https://’ so the user doesn’t have to enter it. »
2. Debugging with Visual Context (The « Screenshot » Hack)
- Task: Fix a UI bug where a globe icon overlapped the text.
- Strategy: Text descriptions can be vague. Screenshots provide perfect context.
- Workflow:
- Take a screenshot of the bug.
- Paste the image directly into the Assistant chat.
- Prompt: « The globe icon overlaps with the HTTPS text. Can you fix it? »
- Note: If Assistant makes a mistake or the code errors out, simply copy the error message or describe the new issue and paste it back in. Iterate until it works.
🌐 Phase 3: Deploying to the Web
Deployment turns your development environment into a permanent, public website.
The Deployment Process:
- Click « Deploy »: Found in the top menu (requires Replit Core subscription).
- Configure: Replit automatically detects the build and run commands. You generally don’t need to change these.
- Name Your App: Choose a unique subdomain (e.g.,
seo-tag-inspector.replit.app). - Wait (~2-3 mins): Replit bundles your entire environment (code, dependencies, config) and pushes it to the cloud.
Crucial Deployment Concepts:
- It’s a Snapshot: Deployment captures the app exactly as it is right now. If you make changes later, they will not appear on the live site until you click « Redeploy. »
- Live URL: You get a permanent public URL that anyone can access, distinct from the temporary « WebView » URL used during development.
- Analytics & Logs: Once deployed, you can view logs (to see why errors happen) and analytics (to see how many people are visiting).
✅ Summary Checklist
- Clear Context: Start a new chat for major feature additions.
- Agent for Features: Use Agent to build complex visualizations or new systems.
- Assistant for Polish: Use Assistant for quick UI fixes and text changes.
- Visual Debugging: Paste screenshots into the chat to fix UI alignment issues quickly.
- Deploy: When the app is ready, deploy it to share a permanent link with the world. Remember to redeploy after future updates!
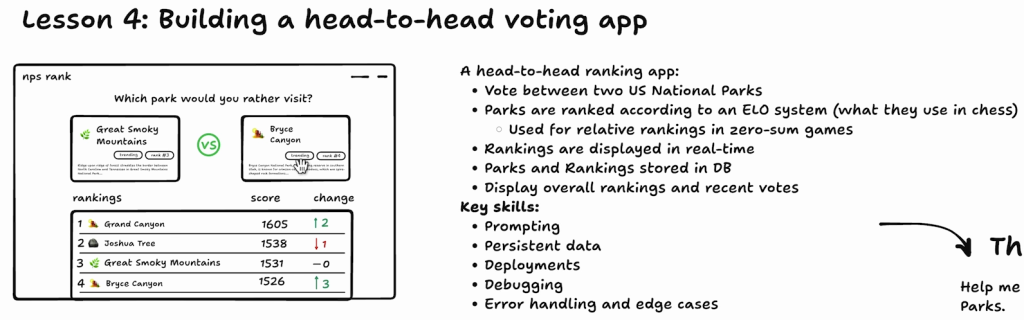
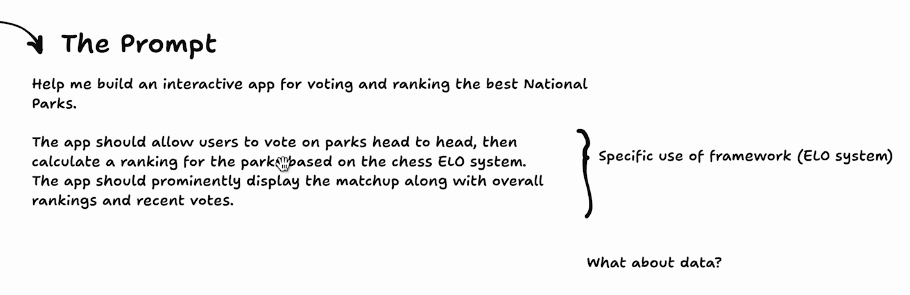
Here is a compact, actionable summary of the lesson on building a National Parks Ranking App.
🏔️ Building a National Parks Ranking App: The Compact Guide
This lesson covers building a complex, data-driven application with persistent storage, external data scraping, and database integration.
📋 Phase 1: Advanced Prompting with External Context
To build an app with real data, you need to provide the AI with that data source. Don’t rely on the AI’s training data alone.
1. Fetch Web Content Directly:
- Paste a URL (e.g., a Wikipedia list of National Parks) into the Agent chat.
- Select « Get text content » (not screenshot) to scrape the page data directly into the context window.
2. Use Visual Wireframes as Context:
- Draw your UI on a whiteboard tool.
- Take a screenshot of your wireframe.
- Paste the image directly into the Agent prompt. This gives the AI a precise visual target for the layout.
3. The « Mega-Prompt » Structure:
Combine these elements for a powerful initial prompt:
« Help me build an interactive app for voting and ranking National Parks using the Chess ELO system. [Paste Wikipedia Text Content] [Attach Wireframe Screenshot]. The app should prominently display matchups, overall rankings, and recent votes. »
🐍 Phase 2: Handling Complex Data & Multi-Language Environments
When the AI needs to process complex external data (like an HTML table from Wikipedia), it might need to write scripts to parse it.
1. Let Agent Write Scripts:
- If the data isn’t loading correctly, explicitly tell Agent: « The parks data is listed in a table on this Wikipedia page. Please fetch the page, download it, and extract all parks from the source HTML. »
- Multi-Language Magic: Replit allows you to run multiple languages in one project. Even if your app is TypeScript/JavaScript, Agent might write a Python script (using
beautifulsouporrequests) to scrape and parse the data, then save it as a JSON file for your main app to use.
2. Verify the Data:
- Check the generated JSON file. Ensure all 63 parks are there and that image URLs are correct.
- Tip: It is often better to get the data fetching working with in-memory storage (JSON files) before trying to connect a database. Get the logic working first, then make it persistent.
🗄️ Phase 3: Database Integration & Migration
Moving from temporary JSON storage to a permanent Postgres database is a critical step for a real app.
1. The Migration Prompt:
Once your app works with JSON, ask Agent to migrate it:
« Our app currently uses hardcoded data in
parks_data.json. We need to move this to a Postgres database so data persists across sessions. Analyze the JSON structure, create a database schema, and perform the necessary migrations to import the data. »
2. Understanding the Setup:
- Secrets: Replit uses a « Secrets » tab to store database connection strings (environment variables). Agent handles this automatically.
- Database Viewer: Use Replit’s built-in database tab to inspect your tables (
parks,votes,users,matchups) and verify data is being saved.
3. The « Rollback » Safety Net:
Database migrations are complex and often fail.
- If it breaks: Don’t panic. Use the Git/Checkpoint feature to roll back to the last working version (before the database attempt).
- Try Again: Start a new chat session (to clear context) and try a more specific prompt.
- Better Prompt: « Create a Postgres database schema based on
parks_data.json. Be explicit about data types. Perform a migration to import the JSON data into the new tables. »
- Better Prompt: « Create a Postgres database schema based on
🧪 Phase 4: Testing the ELO System
With the database connected, verify the logic.
- Vote: Select a park in a matchup.
- Check DB: Look at the
votestable. Did a new row appear? - Check Rankings: Did the winner’s score increase? Did the loser’s decrease?
- Persistence: Restart the app. Are the rankings still there? If yes, your database integration is successful.
✅ Key Takeaways for Complex Apps
- Context is King: Use screenshots, text dumps, and URLs to give the AI all the information it needs.
- Iterate on Storage: Get it working with JSON/In-Memory first. Then migrate to a database.
- Embrace Rollbacks: Complex features like database migrations often fail on the first try. Use Git checkpoints to undo mistakes safely.
- New Chat = Fresh Mind: If Agent gets stuck in a loop of errors, start a new chat session to give it a clean slate.
Here is a compact, actionable summary of the final lesson on refining, understanding, and deploying the National Parks Ranking App.
🏔️ Finalizing & Deploying the Parks App: The Compact Guide
In this final lesson, we wrap up the National Parks app by using Assistant to understand the code Agent wrote, and then deploying the full-stack application to the live web.
🧠 Phase 1: Using Assistant as a « Code Tutor »
When Agent builds complex features (like connecting a database), it might use frameworks or patterns you aren’t familiar with. Instead of just accepting the code, use Assistant to reverse-engineer and learn from it.
1. Ask for a High-Level Architecture Review:
- Prompt: « Help me understand what frameworks we used for our database. How does it work and how are we managing it? »
- Result: Assistant will scan your files and explain that you are using Postgres (via connection URLs in Secrets) and Drizzle ORM (a TypeScript-first Object-Relational Mapper).
2. Drill Down into Specific Concepts:
- If you don’t know what an ORM is, just ask!
- Prompt: « What is an ORM framework and why would I use Drizzle ORM? »
- Result: Assistant explains that ORMs let you interact with databases using code objects instead of raw SQL, providing benefits like type safety and easier schema management.
- Pro Tip: This is the ultimate cheat code for learning to code. You aren’t just letting AI write your app; you are having it tutor you on the architecture it just built.
🚀 Phase 2: Deploying a Full-Stack App (With Databases!)
Deploying an app with a database is traditionally a massive headache involving external servers, API keys, and environment variables. Replit collapses all of this into a single click.
1. Configure the Deployment:
- Click Deploy and select Autoscale (which handles scaling your app as traffic grows).
- Name your app (e.g., « Park Challenge »).
2. The Magic of « Secrets »:
- Notice that Replit automatically detects and includes your Database Secrets (the connection strings) in the deployment configuration.
- You do not need to manually provision a production database, create a new account, or copy-paste API keys. Replit handles the bridge between your live app and your Postgres database automatically.
🌐 Phase 3: Verifying Production Persistence
Once deployed, you get a permanent public URL. It’s time to verify that the live app is actually talking to the live database.
- Open the Live URL: Share it with a friend or open it on your phone.
- Cast a Vote: Vote for a park (e.g., Mammoth Cave).
- Test Persistence: Refresh the page. Your vote and the updated ELO rankings should still be there.
- Success: Because the data persists across page refreshes and sessions, you have successfully deployed a fully functional, persistent, full-stack application.
🌊 The Core Philosophy of « Vibe Coding »
This course has demonstrated the true power of the Vibe Coding workflow:
- You are the Product Manager: You did the planning, wireframing, and logical thinking.
- You are the Context Manager: You provided the AI with Wikipedia data, screenshots, and specific constraints.
- The AI is the Engineering Team: Agent handled the frontend, backend, Python data-scraping scripts, database provisioning, and ETL (Extract, Transform, Load) processes.
The Ultimate Takeaway: You can build, iterate, and deploy complex, multi-language, database-backed applications entirely from a single chat pane, guided by your intuition and the AI’s execution.
Here is a compact, actionable summary of the final lesson, wrapping up the core concepts of the course and outlining your next steps.
🎓 Course Wrap-Up: Mastering Vibe Coding with Replit
Congratulations! You have successfully built and deployed two production-ready, full-stack applications (an SEO Analyzer and a National Parks Ranker) with persistent databases, all without manually writing a single line of code.
Here is a recap of the core philosophy and the 5 essential skills that made it possible.
🧠 The 5 Pillars of Vibe Coding (Recap)
- Thinking (Logical to Procedural):
Move beyond just asking « what is the problem? » (Logical) to « how do we instruct a computer to solve this problem? » (Procedural). Understand the mechanics of what you are building (e.g., how SEO tags work, or how the ELO rating system calculates rankings). - Frameworks (Learning as You Build):
You don’t need to know every tool beforehand. Use the AI to teach you. If Agent uses a tool you don’t recognize (like Drizzle ORM or Postgres), ask Assistant to explain it. Understanding your frameworks helps you debug effectively. - Checkpoints (Safety Nets):
Things will break. Use Replit’s built-in version control (Git) to create checkpoints after every successful feature. If a new prompt ruins your app, simply roll back to the last working state. - Debugging (Methodical Problem Solving):
Treat debugging like a detective. Understand how the app is supposed to work, isolate where the error is happening, find the root cause, and feed that specific context back to the AI to fix it. - Context (The Most Important Rule):
The AI is only as good as the information you give it. Provide screenshots of your wireframes, paste URLs for the AI to scrape, share error logs, and be hyper-specific about your goals.
🔄 The Ultimate Vibe Coding Loop
To build anything complex, rely on this continuous, iterative cycle:
- Prompt: Ask the Agent to build a specific, bite-sized feature (providing rich context).
- Test: Interact with the app. Try to break it. Check the UI, the data, and the logic.
- Debug: If it breaks, isolate the issue. Use Assistant to understand the code or fix the error.
- Checkpoint: Once it works perfectly, save your progress.
- Repeat: Start a fresh chat (to clear the context window) and prompt the next feature.
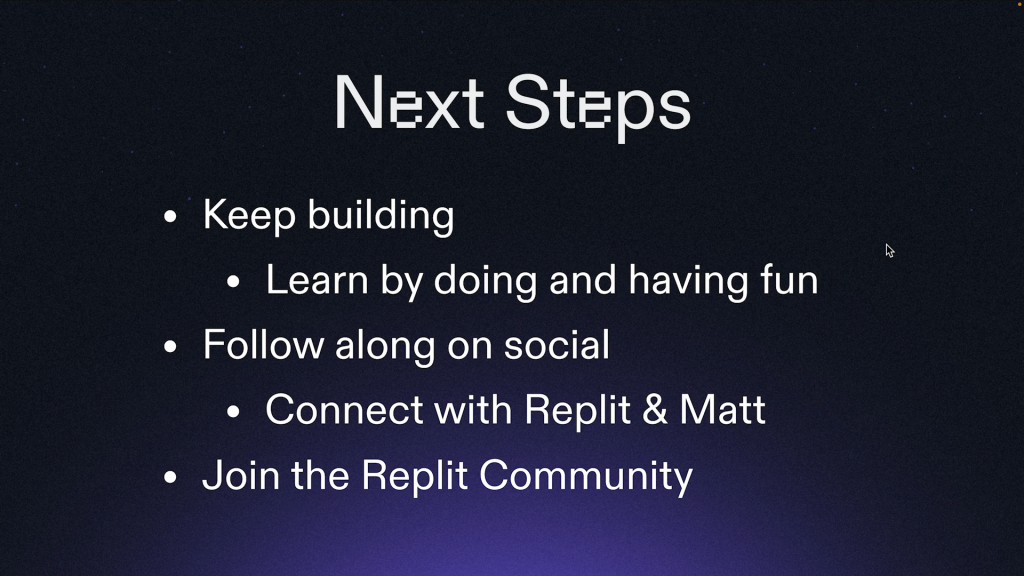
🚀 Next Steps: Keep the Vibe Going
You now have the toolkit to build real software. Here is how to level up:
- Keep Building: The best way to learn is by doing. Don’t stop here.
- Automate Your Life: Look for repetitive tasks, annoying workflows, or ideas in your daily life and build tools to solve them.
- Share Your Work: Deploy your apps, share the URLs with friends, and post your creations on social media or the Replit community.
- Embrace the AI: Treat the AI not just as a code generator, but as a junior developer, a tutor, and a sounding board for your ideas.
You are now a Vibe Coder. Go build something amazing!