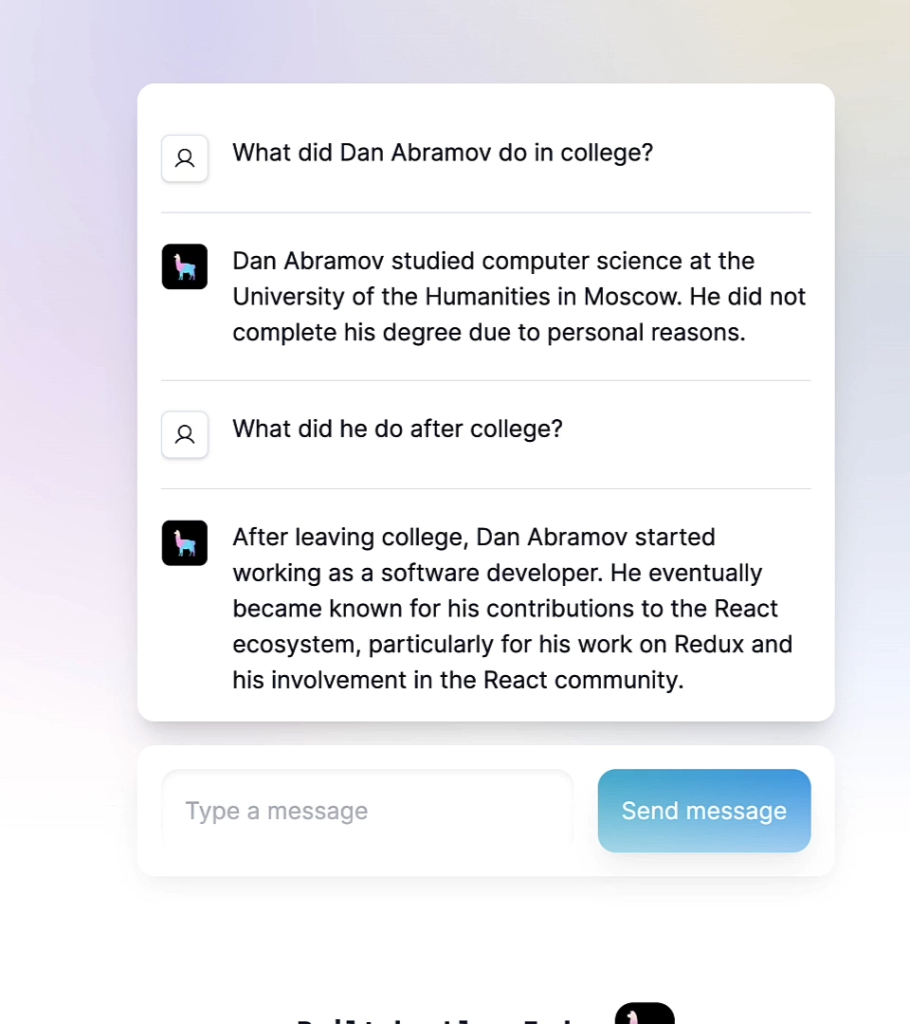
Full course: https://www.deeplearning.ai/courses/javascript-rag-web-apps-with-llamaindex
1/ Getting started with RAG
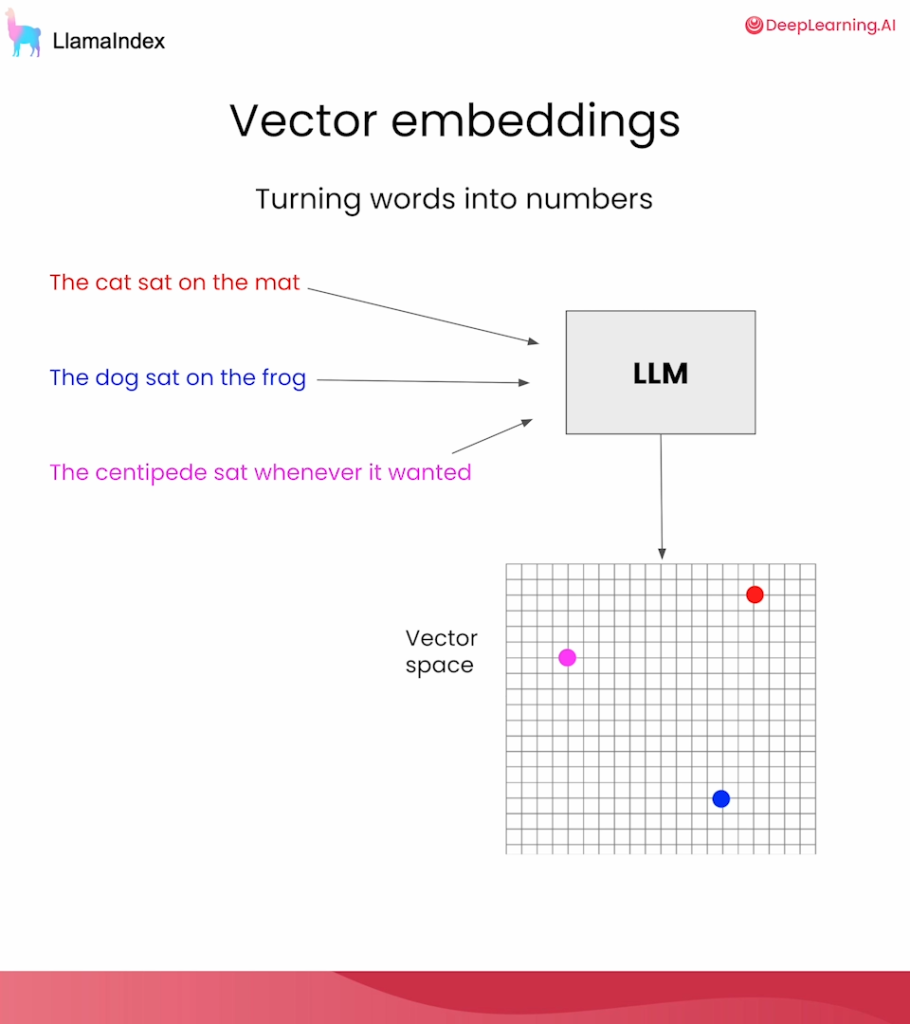
Welcome to the world of AI engineering! Since you already have a strong programming background, you’ll pick up these concepts quickly. The main shift from traditional programming to AI is that instead of writing exact logic to process data, you are orchestrating models to understand and generate human language.
Here is a simplified, developer-friendly breakdown of the first part of your tutorial.
1. What is RAG and Why Do We Need It?
RAG stands for Retrieval-Augmented Generation. It is the standard architectural pattern for building AI apps that use private or specific data.
The Problem with standard LLMs (like ChatGPT):
- They don’t know your data: They are trained on public internet data. They don’t know your company’s internal docs, your personal notes, or your database.
- Context Window Limits: Even though modern LLMs can handle hundreds of thousands of « tokens » (words/pieces of words), your total data is likely in the millions. You can’t just dump your entire database into the prompt.
- Cost & Latency: Sending massive amounts of text to an API for every single query is incredibly slow and expensive.
The Solution (RAG):
Instead of giving the LLM all your data, you only give it the relevant data.
- Retrieval: Search your database to find the specific documents related to the user’s question.
- Augmented Generation: Pass those specific documents + the user’s question to the LLM so it can generate an accurate answer.
2. How Do We Find « Relevant » Data? (Vector Search)
In traditional programming, you might use SQL LIKE '%query%' or ElasticSearch. But if a user searches for « feline » and your document says « cat », keyword search fails. AI solves this using Vector Search.
- Embeddings: We pass text through an « Embedding Model ». This model converts text into a giant array of numbers (a vector). These numbers represent the semantic meaning of the text.
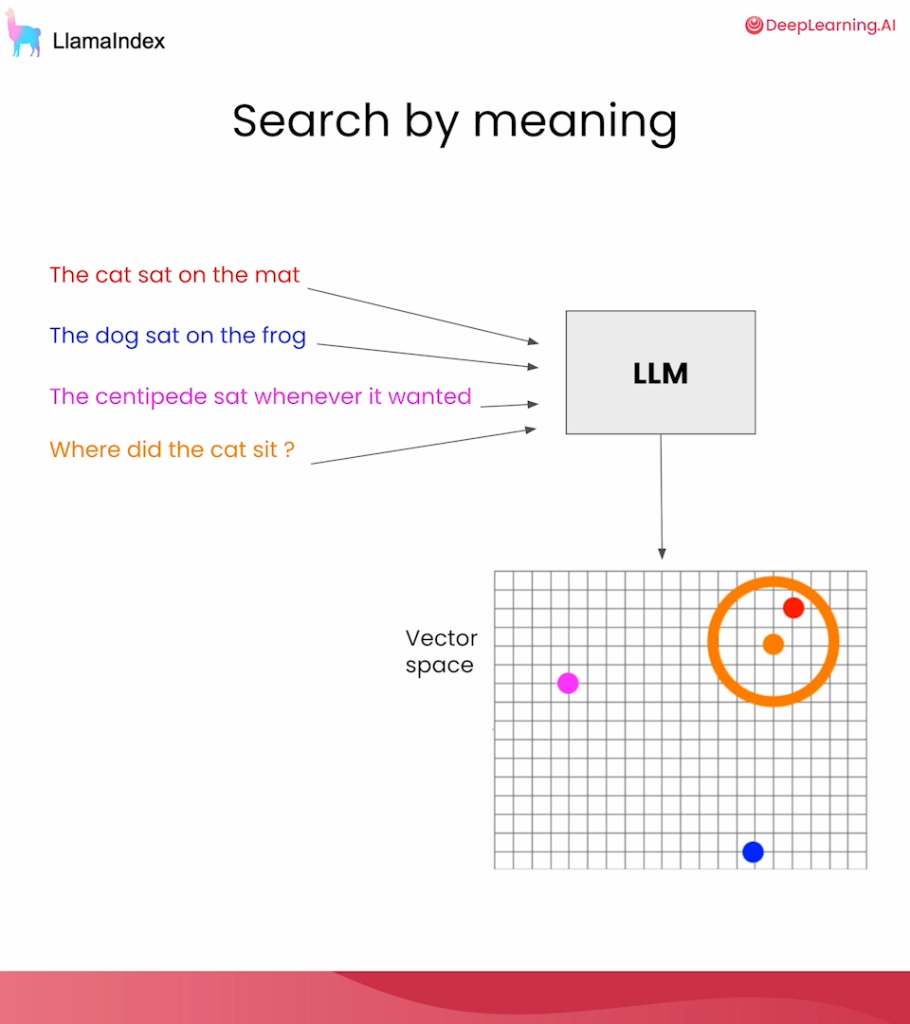
- Vector Space: Imagine a massive multi-dimensional graph. Text with similar meanings are plotted close to each other. « Cat » and « feline » will have vectors that are mathematically very close.
- The Magic: When a user asks a question, we convert their question into a vector. We then look at our database of document vectors and find the ones that are mathematically closest to the question vector.
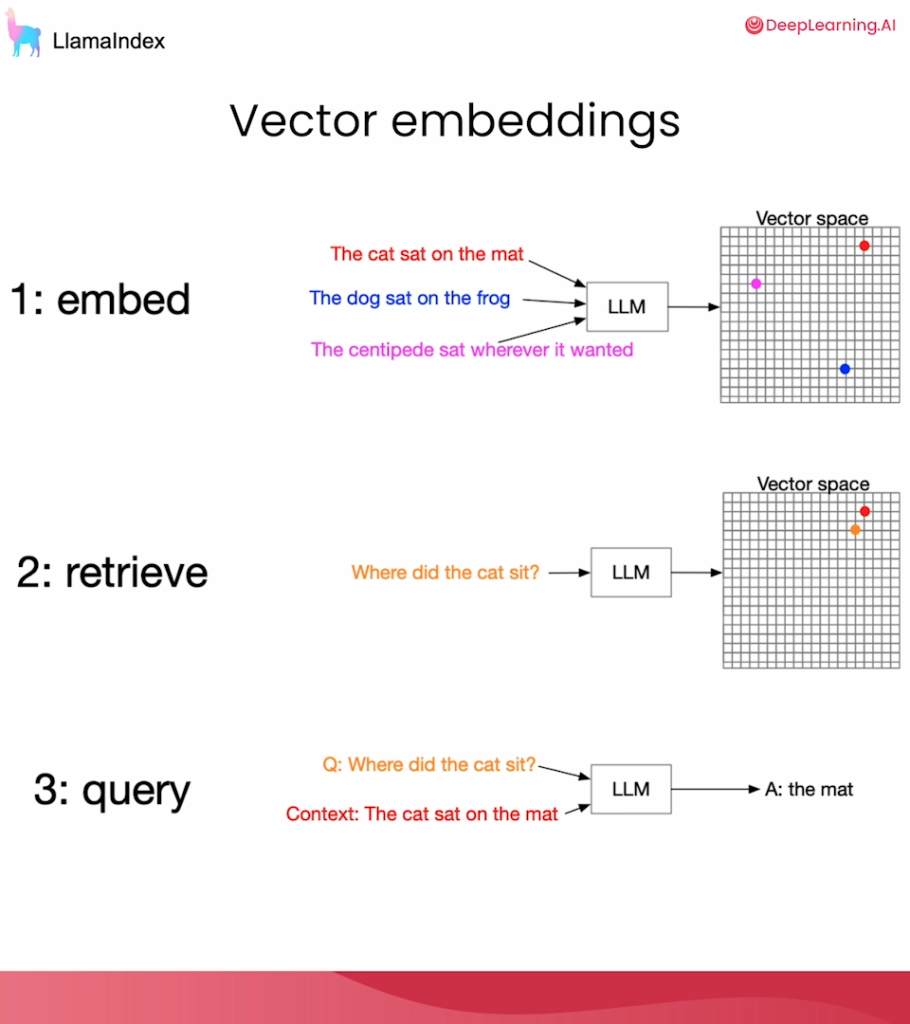
3. The Basic RAG Flow
As a developer, think of the RAG pipeline as a standard data processing pipeline:
- Index: Convert all your documents into vectors and store them in a Vector Database.
- Query: Convert the user’s question into a vector.
- Retrieve: Find the closest document vectors in the database and fetch the original text.
- Generate: Inject that text into a prompt template and send it to the LLM.
- Answer: The LLM reads the context and answers the question.
4. Coding it with LlamaIndex (The « Easy Way »)
LlamaIndex is a framework that handles all the heavy lifting for RAG. In the tutorial, they use a dataset of an essay by Dan Abramov (creator of React).
Here is the high-level flow to get RAG working in just a few lines of code:
// 1. Setup: Load your API key and import LlamaIndex
// 2. Load Data: Read files from a local folder
const documents = await SimpleDirectoryReader.loadData("./data");

// 3. Create Index: LlamaIndex automatically chunks the text,
// creates embeddings, and stores them in a vector index.
const index = await VectorStoreIndex.fromDocuments(documents);

// 4. Create Query Engine: This bundles the Retriever and the LLM together.
const queryEngine = index.asQueryEngine();

// 5. Query & Print: Ask a question and get the answer!
const response = await queryEngine.query("What did the author do in college?");
console.log(response.toString());
// Output: Dan dropped out of college.
5. Under the Hood: Building a Custom RAG Pipeline
The « Easy Way » is great for prototyping, but as an engineer, you need to know how the gears turn so you can customize them. Let’s break that single asQueryEngine() line into its modular components.
The Architecture:
- LLM: The brain that generates text (e.g., OpenAI’s GPT).
- Embedding Model: The translator that turns text into vectors.
- Service Context: A configuration object that holds your LLM and Embedding model settings.
- Retriever: The search engine that looks at the Vector Index and fetches relevant text chunks.
- Synthesizer: Takes the retrieved text and your prompt, formats them together, and sends them to the LLM.
- Query Engine: The master orchestrator that connects the Retriever and the Synthesizer.
Customizing the Prompt:
In the tutorial, they create a custom prompt template. The default prompt just says « Answer the question based on the context. » They change it to: « Answer the question, but also include a random fact about whales. »
The Component Flow:
- Initialize the LLM and Embedding Model, and wrap them in a ServiceContext.
- Define your custom PromptTemplate.
- Create a ResponseBuilder using the ServiceContext and Prompt.
- Create a Synthesizer using the ResponseBuilder.
- Create a Retriever from your Vector Index.
- Combine the Synthesizer and Retriever into a custom QueryEngine.
- Query it!
Because of the custom prompt, the output is now: « Dan dropped out of college. Also, whales are known to communicate with each other using complex songs that can travel long distances underwater. »
Key Takeaways for You
- RAG is just a search-and-inject pattern. You search for context, inject it into a prompt, and let the LLM do the talking.
- Vector Databases are just semantic search engines. They use math (embeddings) to find concepts, not just keywords.
- LlamaIndex abstracts the pipeline. You can use the high-level API for speed, or break it down into
Retriever,Synthesizer, andPromptobjects when you need fine-grained control.
Next up in the course: Taking this backend RAG logic and wrapping it into a full-stack web application using React!
Lesson 1: Getting started with RAG
Welcome to Lesson 1.
To access the data file, go to File and click on Open.
I hope you enjoy this course!
Import required dependencies from npm and load the API key
import * as mod from "https://deno.land/std@0.213.0/dotenv/mod.ts";
const keys = await mod.load({export:true}) // read API key from .env

import {
    Document,
    VectorStoreIndex,
    SimpleDirectoryReader
} from "npm:llamaindex@0.1.8"
Load our data from a local directory
const documents = await new SimpleDirectoryReader()
    .loadData({directoryPath: "./data"})
Initialize an index
const index = await VectorStoreIndex.fromDocuments(documents)Create a query engine
This convenience function combines several components:
- Retriever
- Postprocessing
- Synthesizer
const queryEngine = index.asQueryEngine()Let’s ask a question!
const response = await queryEngine.query({
    query: "What did the author do in college?"
})
console.log(response.toString())
But what just happened? Let’s break it down!
You need an:
- LLM to answer questions
- Embedding model to encode them
import * as llamaIndex from "npm:llamaindex@0.1.8"
let customLLM = new llamaIndex.OpenAI()
let customEmbedding = new llamaIndex.OpenAIEmbedding()
Let’s put the LLM and the embedding model into a ServiceContext object:
let customServiceContext = new llamaIndex.serviceContextFromDefaults({
    llm: customLLM,
    embedModel: customEmbedding
})
Let’s make our own prompt:
let customQaPrompt = function({context = "", query = ""}) {
    return `Context information is below.
        ---------------------
        ${context}
        ---------------------
        Given the context information, answer the query.
        Include a random fact about whales in your answer.\
        The whale fact can come from your training data.
        Query: ${query}
        Answer:`
}
You need a ResponseBuilder that uses our prompt and our service context.
let customResponseBuilder = new llamaIndex.SimpleResponseBuilder(
    customServiceContext,
    customQaPrompt
)
The responseBuilder goes to a synthesizer, which also needs a service context.
let customSynthesizer = new llamaIndex.ResponseSynthesizer({
    responseBuilder: customResponseBuilder,
    serviceContext: customServiceContext
})
You also need a retriever.
let customRetriever = new llamaIndex.VectorIndexRetriever({
    index
})
The synthesizer and the retriever go to our query engine:
let customQueryEngine = new llamaIndex.RetrieverQueryEngine(
    customRetriever,
    customSynthesizer
)
Let’s check the response!
let response2 = await customQueryEngine.query({
    query: "What does the author think of college?"
})
console.log(response2.toString())
(Note: console.log(response2.toString()) … this is Jupyter for this course)
Here is the simplified, developer-friendly breakdown of the second part of your tutorial.
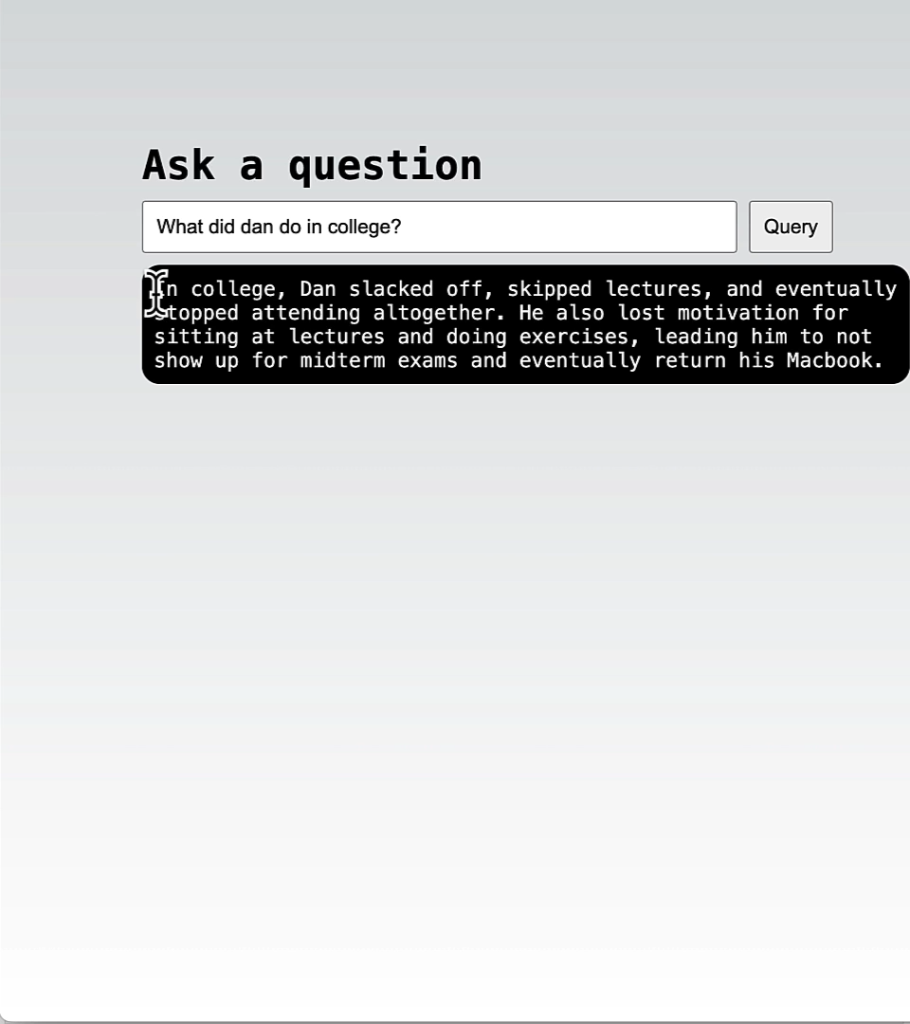
In Lesson 1, you built a RAG engine in a script. In Lesson 2, you are wrapping that engine in a Backend API and building a React Frontend to interact with it, creating a complete Full-Stack AI application.
Part 1: Building the Backend API (with Deno)
To make your RAG engine accessible to a web browser, you need to expose it via an HTTP API. The course uses Deno, a modern, secure runtime for JavaScript.
Step 1: The Basic « Hello World » Server
First, the tutorial shows how easy it is to spin up a server in Deno. You define a handler function that takes a Request and returns a Response.
// A simple Deno server
Deno.serve({ port: 8001 }, (req) => {
    const encoder = new TextEncoder();
    const body = encoder.encode("Hello World");
    return new Response(body, { status: 200 });
});
Step 2: Upgrading to a RAG API
Next, we swap « Hello World » with our LlamaIndex queryEngine.
The Flow:
- Check if the request is a
POST(since we are sending data). - Parse the incoming JSON body to extract the user’s
query. - Pass that query to the LlamaIndex
queryEngine. - Return the LLM’s answer as a JSON response.
The Backend Code:
// Assuming 'queryEngine' is already initialized from Lesson 1
Deno.serve({ port: 8002 }, async (req) => {
    if (req.method === "POST") {
        // 1. Parse the incoming JSON
        const data = await req.json();
        const userQuery = data.query;

        // 2. Query the RAG engine
        const answer = await queryEngine.query({ query: userQuery });

        // 3. Return the response as JSON
        return new Response(JSON.stringify({ response: answer.toString() }), {
            status: 200,
            headers: { "Content-Type": "application/json" }
        });
    }
    // Return 404 for non-POST requests
    return new Response("Not Found", { status: 404 });
});
Part 2: Building the Frontend (React)
Now we need a UI. The tutorial builds a React component iteratively to teach you how React handles state and interactivity. (Note: The course uses a custom addToFrontEnd() function to render things inside a Jupyter Notebook, but the React logic is standard).
Step 1: Understanding React State (useState)
In traditional JS, you might update the DOM directly. In React, you use State. When state changes, React automatically re-renders the UI.
- The Counter Example: They start with a static number
10. Then they convert it to state:const [count, setCount] = useState(0);. - When you click a button, it calls
setCount(count + 1), and React updates the screen.
Step 2: Building the QuerySender UI
Next, they build the actual interface for the RAG app. It needs:
- A text input for the user to type a question.
- A submit button.
- A display area for the answer.
function QuerySender() {
    return (
        <div>
            <h1>Ask the AI</h1>
            <form>
                <input type="text" placeholder="Ask a question..." />
                <button type="submit">Query</button>
            </form>
            <div className="answer-box">
                {/* The answer will go here */}
            </div>
        </div>
    );
}
Step 3: Adding Interactivity (Handling Input & Submissions)
To make the form work, we need to track what the user is typing and handle the form submission without reloading the page.
querystate: Tracks the text in the input box.answerstate: Tracks the response from the AI.e.preventDefault(): Crucial for forms! It stops the browser from doing a hard page refresh when the user clicks « Submit ».
Step 4: Connecting to the Backend (The Magic Moment)
Finally, we update the handleSubmit function to actually call our Deno API.
Crucial UX Pattern for AI: LLMs take a few seconds to think. If you don’t give the user feedback, they will think the app froze. The tutorial introduces a « Thinking… » state.
The Final React Component:
import { useState } from "react";

function QuerySender() {
    const [query, setQuery] = useState("");
    const [answer, setAnswer] = useState("");

    // Updates the 'query' state as the user types
    const handleChange = (e) => {
        setQuery(e.target.value);
    };

    // Handles the form submission
    const handleSubmit = async (e) => {
        e.preventDefault(); // Prevent page reload

        // 1. Show immediate feedback
        setAnswer("Thinking...");

        try {
            // 2. Call our Deno Backend API
            const res = await fetch("http://localhost:8002", {
                method: "POST",
                headers: { "Content-Type": "application/json" },
                body: JSON.stringify({ query: query })
            });

            const data = await res.json();

            // 3. Update the UI with the real answer
            setAnswer(data.response);
        } catch (error) {
            setAnswer("Error fetching response.");
        }
    };

    return (
        <div>
            <h1>Ask the AI</h1>
            <form onSubmit={handleSubmit}>
                <input
                    type="text"
                    value={query}
                    onChange={handleChange}
                    placeholder="What did the author do in college?"
                />
                <button type="submit">Query</button>
            </form>
            <div className="answer-box">
                <strong>Answer:</strong> {answer}
            </div>
        </div>
    );
}
Key Takeaways for You
- The Full-Stack AI Pattern: You now know the standard architecture for an AI app: Frontend (React) captures input -> Backend API (Deno/Node) handles routing and logic -> RAG Engine (LlamaIndex) retrieves context and queries the LLM -> Response flows back to the UI.
- State Management is Key: In React, everything revolves around
useState. You need state for the user’s input, the loading status, and the final output. - AI UX Matters: Always implement a « loading » or « thinking » state when calling an LLM API, because network + generation latency is noticeable to the user.
Whenever you are ready, drop the next part of the transcript (Lesson 3: Advanced queries with Agents)!
Here is the breakdown for Lesson 3: Advanced queries with Agents.
As a programmer, you are going to love this lesson. This is where AI stops being just a « chatbot that summarizes text » and starts becoming an autonomous software agent that can execute logic, query specific databases, and perform actions.
1. The Problem with Basic RAG: « The Big Pile of Data »
In Lessons 1 and 2, we dumped all our documents into one single vector index. But in a real-world production app, your data is siloed.
- You might have one database for HR policies.
- Another for Engineering documentation.
- Another for Customer Support tickets.
If you dump them all into one index, the vector search might get confused, and the context window might get cluttered with irrelevant information.
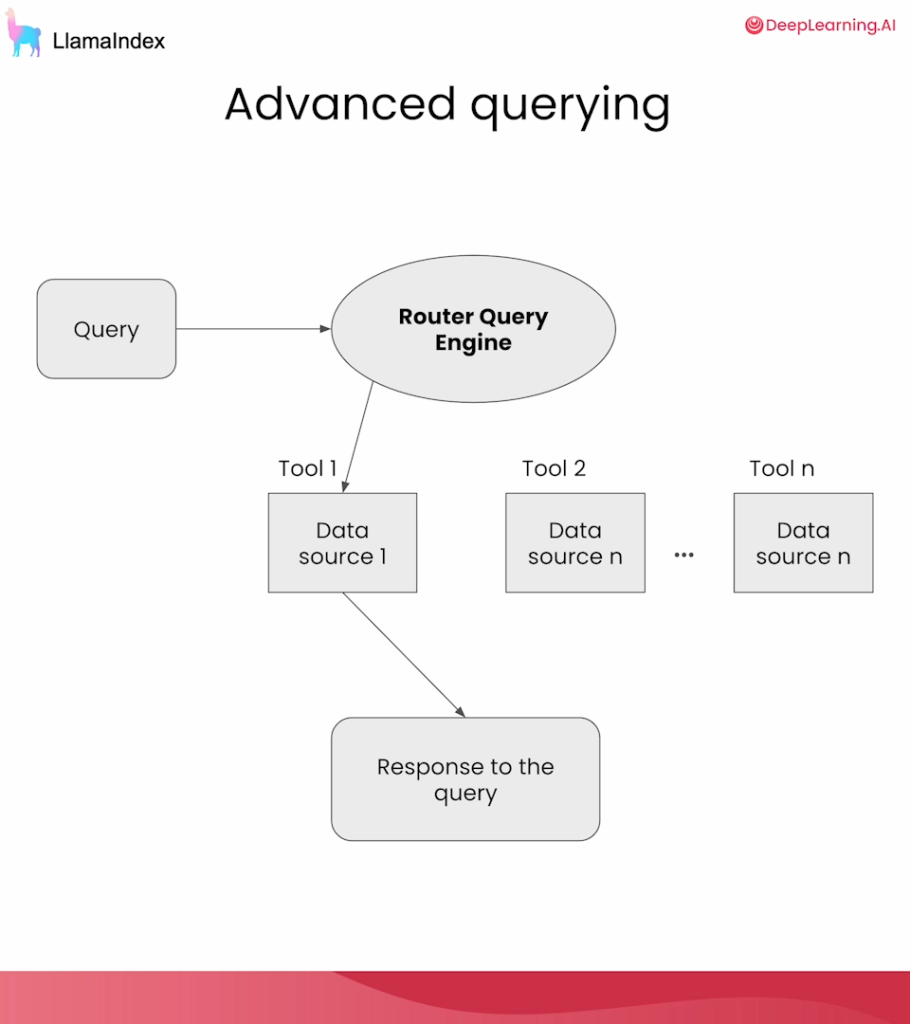
The Solution: Create separate RAG pipelines (Indexes/Query Engines) for each data source, and let the AI decide which one to search based on the user’s question.
2. The Router Query Engine (Smart API Gateway)
Think of a Router Query Engine like an AI-powered API Gateway or Reverse Proxy. Instead of routing based on URL paths (e.g., /api/hr vs /api/eng), it routes based on the semantic meaning of the user’s question.
How it works:
- You create multiple
QueryEngineinstances (one for Dan Abramov’s essay, one for React’s Wikipedia page). - You wrap each engine in a
QueryEngineTool. - You provide a description for each tool. This description is crucial—it’s the routing logic the LLM reads to make its decision.
- You pass these tools into the
RouterQueryEngine.
The Code Concept:
// Tool 1: Dan's Essay
const danTool = new QueryEngineTool({
    queryEngine: danQueryEngine,
    metadata: {
        name: "dan_tool",
        description: "Useful for questions about Dan Abramov's career and college."
    }
});

// Tool 2: React Docs
const reactTool = new QueryEngineTool({
    queryEngine: reactQueryEngine,
    metadata: {
        name: "react_tool",
        description: "Useful for questions about the React JavaScript library."
    }
});

// The Router
const routerEngine = new RouterQueryEngine({
    selector: new LLMSelector(), // The LLM acts as the router
    queryEngineTools: [danTool, reactTool]
});

// Ask a question. You don't tell it which tool to use. It figures it out!
const response = await routerEngine.query("What is React?");
// -> Routes to reactTool automatically.
3. Agents and Tool Use (Executing Custom Functions)
Router engines are great for searching data, but what if you want the AI to do something? Like calculate a math equation, fetch live stock prices, or write to a database?
LLMs are notoriously bad at math (they predict text, they don’t calculate). To fix this, we use Agents. An Agent is an LLM that has been given a toolbox of executable functions.
How Tool Use Works (The « Function Calling » pattern):
- Define a standard JavaScript function: e.g.,
function add(a, b) { return a + b; } - Define a JSON Schema: You must describe the function’s name, what it does, and the required arguments (parameters) so the LLM knows how to invoke it.
- Give it to the Agent: The Agent will look at the user prompt. If it realizes it needs to do math, it will generate the JSON arguments, pause its own generation, execute your JS function, read the result, and then resume talking to the user.
The Code Concept:
// 1. The actual code logic
function sumNumbers({ a, b }) {
    return a + b;
}

// 2. The JSON Schema / Tool Definition
const mathTool = FunctionTool.from(sumNumbers, {
    name: "sum_numbers",
    description: "Use this tool to add two numbers together.",
    parameters: {
        type: "object",
        properties: {
            a: { type: "number", description: "The first number" },
            b: { type: "number", description: "The second number" }
        },
        required: ["a", "b"]
    }
});

// 3. Create the Agent
const agent = new OpenAIAgent({
    tools: [mathTool],
    verbose: true // Prints the Agent's "thoughts" and tool calls to the console
});

// Ask a question.
const response = await agent.chat("What is 501 plus 5?");
// -> The LLM knows it's bad at math, so it calls `sumNumbers({a: 501, b: 5})`.
// -> Your code returns 506.
// -> The LLM reads 506 and says: "501 plus 5 is 506."
4. Agents on Agents: The Ultimate Composition
The most powerful part of this lesson is the realization that everything is a tool.
You can take the RouterQueryEngine from step 2, wrap it in a tool definition, and hand it to your Agent alongside your mathTool.
Now, if a user asks: « How many years was Dan Abramov in college, and what is that number plus 10? »
- The Agent reads the prompt.
- It decides it needs data first, so it calls the Router Tool.
- The Router reads the prompt, routes it to the Dan Tool, searches the vector database, and returns: « He was in college for 2 years. »
- The Agent receives « 2 years ». It realizes it still needs to do math.
- The Agent calls the Math Tool, passing
a: 2andb: 10. - The Math Tool returns
12. - The Agent formulates the final response to the user.
You have just built a semi-autonomous, multi-step reasoning engine!
Key Takeaways for a Developer
- Tool Use (Function Calling) is the bridge between AI and traditional software. It allows LLMs to interact with APIs, databases, and deterministic code (like math or date formatting).
- Descriptions are your routing logic. When defining tools, the
descriptionstring acts as the conditionalif/elselogic for the LLM. Writing clear, precise descriptions is a new core skill for AI engineers. - Agents introduce latency and complexity. Because an Agent might « think » and call multiple tools in a loop, a single query can result in 3 or 4 LLM API calls under the hood. Keep this in mind for cost and latency management in production.
- Verbose mode is your debugger. When building agents, always turn on
verboseor logging so you can see the hidden JSON payloads the LLM is generating to call your functions.
Lesson 4: Production-ready techniques.
Here is the simplified, developer-friendly breakdown of the final lesson: Lesson 4: Production-ready techniques.
Up until now, you’ve been building prototypes. Every time the script ran, it read the raw text, chunked it, sent it to an API to create embeddings (vectors), and built the index in memory. In a real production app, that is too slow and expensive. This lesson covers the three pillars of a production RAG app: Caching (Persistence), State (Chat History), and UX (Streaming).
1. Persisting Data (Caching your Vector Index)
The Problem: Generating embeddings (turning text into vectors) costs money and takes time. If you have 10,000 documents, you don’t want to re-embed them every time your server restarts.
The Solution: Save the generated index to disk (or a dedicated Vector Database like Pinecone, MongoDB Atlas, or PgVector) and load it into memory instantly when your app starts.
In LlamaIndex, this is handled by the StorageContext.
The Code Concept:
// 1. SETUP: Define where to save the data (e.g., a local folder)
import { storageContextFromDefaults } from "llamaindex";

const storageContext = await storageContextFromDefaults({
    persistDir: "./storage"
});

// 2. FIRST RUN: Ingest data and save it to disk
const documents = await new SimpleDirectoryReader().loadData({ directoryPath: "./data" });
const index = await VectorStoreIndex.fromDocuments(documents, { storageContext });
// -> The index is now saved in the "./storage" folder!

// 3. SUBSEQUENT RUNS: Load the index directly from disk (No API calls for embeddings!)
const loadedStorageContext = await storageContextFromDefaults({ persistDir: "./storage" });
const loadedIndex = await VectorStoreIndex.init({ storageContext: loadedStorageContext });

// Now you can query immediately!
const queryEngine = loadedIndex.asQueryEngine();
2. The Chat Engine (Multi-turn Conversations)
The Problem: A standard QueryEngine is stateless. It treats every question as a brand-new, isolated search. If you ask, « What is React? » and then ask, « Who created it? », the engine has no idea what « it » refers to.
The Solution: Use a ChatEngine. It maintains a chatHistory (an array of previous messages) and passes that context to the LLM so it can understand pronouns and follow-up questions.
Key Concepts:
- Retriever: We extract the search logic from the query engine.
similarityTopK: A crucial tuning parameter. IftopK = 3, the engine will fetch the 3 most relevant text chunks from your database to give to the LLM. (Higher = more context, but slower/more expensive).ChatMessage: The history is just an array of objects with arole(« user » or « assistant ») andcontent.
The Code Concept:
import { ContextChatEngine, ChatMessage } from "llamaindex";

// 1. Get the retriever and set how many chunks to fetch
const retriever = loadedIndex.asRetriever();
retriever.similarityTopK = 3;

// 2. Initialize the Chat Engine
const chatEngine = new ContextChatEngine({ retriever });

// 3. Define the history (What was said previously)
const chatHistory = [
    new ChatMessage({ role: "user", content: "What is React?" }),
    new ChatMessage({ role: "assistant", content: "React is a JavaScript library for building user interfaces, created by Meta." })
];

// 4. Ask a follow-up question!
const response = await chatEngine.chat({
    message: "Who created it?", // The LLM knows "it" means React!
    chatHistory: chatHistory
});
3. Streaming Responses (The « ChatGPT » UX)
The Problem: LLMs generate text token-by-token. A full answer might take 3 to 10 seconds. If you wait for the whole string to finish before sending it to the frontend, the user stares at a blank screen and thinks the app froze.
The Solution: Streaming. You send the tokens to the frontend the millisecond they are generated.
In JavaScript/TypeScript, streaming is usually handled via Async Iterators or Server-Sent Events (SSE).
The Code Concept:
// Just add `stream: true` to your chat request!
const responseStream = await chatEngine.chat({
    message: "Tell me a long story about React.",
    chatHistory: [],
    stream: true
});

// Instead of a single string, you get an async iterable
for await (const chunk of responseStream) {
    // 'chunk' is a small piece of the response (e.g., a word or punctuation)
    process.stdout.write(chunk.response); // Print it to the console instantly
    // In a web app, you would send this chunk via SSE or WebSockets to the React frontend
}
4. The Ultimate Shortcut: create-llama
Building the backend API to handle streaming, managing the React frontend state to display the tokens, and wiring up the vector database can be tedious.
LlamaIndex provides a CLI tool (similar to create-react-app or create-next-app) that scaffolds a complete, production-ready full-stack app in seconds.
How to use it:
Open your terminal and run:
npx create-llama@latestIt will ask you a few questions:
- What framework? (Next.js, Express, etc.)
- What data sources? (Local files, web scrapers, etc.)
- What vector database? (Local disk, Pinecone, etc.)
It will then generate a fully wired frontend (React/Next.js) and backend (Node/Deno) with streaming and chat history already implemented. You can just drop your documents into the folder and run it.
Key Takeaways for Your AI Journey
- Never re-embed in production: Always use a
StorageContextor a managed Vector DB. Treat embeddings like a compiled database. - Tune your
topK: If your AI is giving vague answers, increasesimilarityTopKto give it more context. If it’s getting confused by irrelevant info or running too slow, decrease it. - Streaming is mandatory for UX: Users expect AI apps to feel « alive ». Streaming tokens makes the app feel incredibly fast, even if the backend is taking 5 seconds to finish thinking.
- Use the CLI: For your own projects (like the ‘Companion 朋’ concept), don’t build the plumbing from scratch. Run
npx create-llama, look at the code it generates, and customize it.
Congratulations! You have just completed the core concepts of building Full-Stack RAG Applications with JavaScript.
You now understand:
- The Architecture: How data flows from raw text -> embeddings -> vector DB -> LLM.
- The Backend: How to build APIs with Deno/Node and orchestrate LlamaIndex.
- The Frontend: How to manage state in React to handle AI inputs and streaming outputs.
- Advanced Logic: How to build autonomous Agents that can use tools and route queries.
Where would you like to go from here? We can:
- Look at how to deploy one of these apps to the web.
- Discuss how to adapt this architecture for your ‘Companion 朋’ project (e.g., storing immigration laws in a vector DB).
- Dive deeper into how to evaluate if your RAG app is actually giving good answers (RAG Evaluation).